The Structure of a Laid Facing
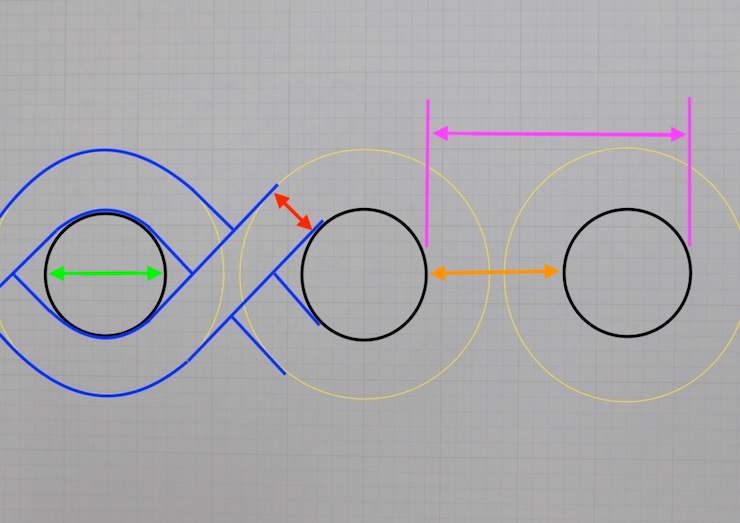
Mould facings vary in how closely the laid wires are packed together. What is perhaps an average proportion is represented above with the spaces being a little wider than the wires. A 53%/47% split is shown between the size of the openings (spaces) and the size of the laid wires. Chain wires tend to be roughly half the diameter of the laid wires. The green arrow shows the laid wire diameter and the red arrow the chain wire diameter. The pink arrow shows the dimension of one wire + one space. This is the laid wire spacing. This is described in wires per inch in these posts. The orange arrow shows the open space between laid wires.

Some Traditional Configurations?
Below are some wire sizes used for Amies moulds taken from a copy of a chart that was given to me. The original listed British Standard wire sizes. The sizes are shown here in decimal inches. I added the percentages in the right-hand column to help compare and understand the relative proportions of the various facings. These fourteen patterns were excerpted from a wider range of from 11 wires per inch to 46 wires per inch.
I don’t understand what the extremely coarse and extremely fine laid facings would have been used for. An 11 wire per inch facing would have had .040″ laid wires and .018″ chain wires. The extremely fine and delicate 46 wire per inch facing would have been made of .0108″ laid wires and .006″ chain wires. Were these ever made?
Facings

Below: Amies laid facing patterns from 17 to 30 wires per inch:
| Laid Wires per inch | Laid Wire Diameter | Twist/Chain Wire Diameter | Space : Wire |
| 17 | .028″ | .0136″ | 53% : 47% |
| 18 | .028″ | .0124″ | 50% : 50% |
| 19 | .024″ | .0124″ | 55% : 45% |
| 20 | .024″ | .0116″ | 52% : 48% |
| 21 | .022″ | .0116″ | 54% : 46% |
| 22 | .020″ | .0116″ | 56% : 44% |
| 23 | .020″ | .0108″ | 53% : 47% |
| 24 | .020″ | .0100″ | 52% : 48% |
| 25 | .018″ | .0092″ | 55% : 45% |
| 26 | .018″ | .0092″ | 53% : 47% |
| 27 | .0164″ | .0092″ | 57% : 43% |
| 28 | .015″ | .0084″ | 58% : 42% |
| 29 | .0136″ | .008″ | 61% : 39% |
| 30 | .0136″ | .008″ | 59% : 41%. |
For the range of facings shown above 7 sizes of laid wire would be needed. And 7 sizes of chain wire also. The laid wires progress in size in roughly .002″ increments and the chain wire in a little less than .001″. The percentages show a range of variation in the proportion of the wire structure from 50:50 to 61:39.
I’ve been working with these figures, using them as benchmarks to increase my understanding of what can work. I can’t say if these are representative of other European paper mould making traditions and makers.
Backings
These two configurations of Amies backing wire were listed:
| Wires per inch | Laid Wire Diameter | Chain Wire Diameter |
| 6.34 Wove Backing | .028″ | .0149″ |
| 5.34 Laid Backing | .022″ | .0124″ |
My Career in Wire
For several decades making moulds I used only a few sizes of wire, all CA510 phosphor bronze. Laid wires were .0254″ diameter (22 gauge), .0226″ (23 gauge) and .0201″ (24 gauge). I have recently added .0183″, .0158″ and .0144″ laid wire stock to expand my range (largely as result of receiving the information above). For years my shop had only four sizes of chain wire; .008″, .010″, .013″ and .015″. I have recently added three more sizes between .010″ and .013″.
My stock of soft (annealed) wire
Five sizes I’ve used for years plus three new ones:
| Uses | Diameter ordered | Tolerances | Actual size received |
| Sewing watermark profiles | .005″ | .0050″ | |
| Chain wire for facings Sewing wire for wove facing Sewing wire for fine laid moulds | .008″ | .0080″ | |
| Chain wire for facings Sewing wire for laid moulds | .010″ | .0102″ | |
| Chain wire for facings (new) | .0108″ | +/- .0003″ | .0106″ |
| Chain wire for facings (new) | .0115″ | +/- .0003″ | .0113″ |
| Chain wire for facings (new) | .0121″ | +/- .0003″ | .0118″ |
| Chain wire for wove backing Sewing wire for wove backing | .013″ | .0130″ | |
| Chain wire for laid backing | .015″ | .0150″ |
The actual sizes were determined with a micrometer. The three new sizes were intended to evenly fill a ‘wide’ gap between .010″ and .013″. This was a little tricky when taking into account the tolerances (+/-.0003″) that were offered by the supplier. In a worst case scenario by ordering a spool each of .0108″ and .0115″ wire I might have received one spool of .0111″ (.0108″ plus ‘three tenths’) and one spool of .0112″ (.0115″ minus ‘three tenths’). Having two sizes only one ten thousandth of an inch apart wouldn’t have helped much! In the end it worked out pretty well but with a wider gap than wished for between the .0118″ and .0130″ sizes. Adding .009″ wire would fill another gap but it likely wouldn’t get much use.
My stock of tempered wire
Wire temper will be covered in the next post.
| Gauge (AWG) | Actual size | Temper |
| Close to 27 gauge | .0144″ | 3/4 hard |
| Close to 26 gauge | .0158″ | 3/4 hard |
| Close to 25 gauge | .0183″ | 3/4 hard |
| 24 gauge | .0201″ | 3/4 hard |
| 23 gauge | .0226″ | 1/2 hard |
| 22 gauge | .0254″ | Spring |
It is possible to purchase tempered wire pre-straightened. I used pre-straightened wire exclusively for decades. One difficulty is ordering the right lengths to avoid excessive waste (you must plan carefully to avoid too-short leftover pieces). It can be expensive to ship long pieces.
Some facings and backings I’ve made
| wires per inch | laid wire | chain wire | counting wheel | ‘clicks’ | arithmetic* | |
| 1 | 18.57 | .0254″ | .010″ (1/4 hard)* | 10 pins | 7 | 10 x 13 = 130 130/7 = 18.57 |
| 2 | 20.8 | .0254″ | .010″ | 8 pins | 5 | 8 x 13 = 104 104/5 = 20.8 |
| 3 | 21.67 | .0254″ | .010″ | 5 pins | 3 | 5 x 13 = 65 65/3 = 21.67 |
| 4 | 7.8 backing (wove) | .0254″ | .013″ | 3 pins | 5 | 3 x 13 = 39 39/5 = 7.8 |
| 5 | 5.78 backing (laid) | .0254″ | .015″ | 4 pins | 9 | 4 x 13 = 52 52/9 = 5.78 |
| 6 | 20.8 | .0226″ | .0113″ | 8 pins | 5 | 8 x 13 = 104 104/5 = 20.8 |
| 7 | 21.67 | .0226″ | .010″ | 5 pins | 3 | 5 x 13 = 65 |
| 8 | 26 | .0226″ | .008″ | 2 pins) | 1 | 13 x 2 = 26 |
| 9 | 21.67 | .0201″ | .0113″ | 5 pins | 3 | 5 x 13 = 65 65/3 = 21.67 |
| 10 | 22 | .0201″ | .0113″ | 22 | 13 | 22 x 13 = 286 286/13 = 22 |
| 11 | 25 | .0183″ | .0106″ | 25 | 13 | 25 x 13 = 325 325/13 = 25 |
| 12 | 27 | .0158″ | .0106″ | 27 | 13 | 27 x 13 = 351 351/13 = 27 |
| 13 | 29.9 | .0144″ | .0102″ | 23 | 10 | 23 x 13 = 299 299/10 = 29.9 |
*The reason that 13 is used in every calculation is that the lead screws have 13 threads per inch. Thus, if you turned the crank (and the two linked lead screws) one full turn each time you add one laid wire you would create a spacing of 13 wires per inch. (It would take thirteen 360 degree, full-turn adjustments to lower the twisting mechanism one inch). Turning the crank 1/2 turn would double the number of adjustments per inch thus yielding 26 wires per inch. Using counting wheels (with different ratios of pins to ‘clicks’) to turn the crank fractionally yields many in-between spacings. 88 of these are listed at the end of the post.
Notes on the above:
#1: About 90% of the moulds I sold used this spacing and combination of wires. I no longer use 1/4 hard wire for this 18.57 wire per inch facing. I use .0118″ diameter soft wire for the chain wire. This wire is only .0016″ larger diameter but about 33 % stronger than .0102″. The chain wires are the most delicate part of a paper mould so this is welcome.
#2 and #3: The laid wires start to get a little tight here compared to the Amies patterns. Facing #2 is about 47%/53% with the spaces less than the width of the wire. Facing #3 is even tighter with a 45%/55% split. In retrospect these facings seem heavier than necessary with undersized chain wires.
#4: This the backing wire configuration used for all of my wove moulds based on a wove mould examined early on. This is a finer spacing than the Amies pattern.
#5: Both of these backings have three half-twists between laid wires. This chain wire (.015″) is the heaviest used so far with this loom.
#6: Note that the same spacing was used with #2 above. But in this case the more widely spaced laid wires would be slightly lighter weight with stronger chain wires. Facing #6 roughly mimics the 21 wire Amies facing.
#7: This spacing works well with the new .0113″ chain wire which I think is better than the .010″ shown.
#8: I sold some moulds with this wire combination. Now I think the .008″ chain wire is pretty delicate and best avoided. This spacing could use .0183″ laid wires with .0102″ chain wires to be closer to the Amies pattern. These wires are tightly packed. They worked though.
#9: Notice that this is the third use of this laid wire spacing. It is the closest to the 22 wire Amies pattern and I think the best of the three. The laid wires are less densely packed and have heavier (stronger) chain wires.
#10 and #11: I was recently asked to make two very large facings based on the Amies patterns for 22 wires per inch and 25 wires per inch. Both worked very well with this loom.
Conclusion: I wish I had known about the Amies patterns early on. I would have spread the laid wires a little wider and used heavier chain wires. I didn’t have as much information as I should have had. On another note, it might have been helpful to work closely with papermakers to learn more about the relationship between wire (sizes and spacing) and the formation and ‘look’ of paper made on them. (As mould makers at Amies presumably did). Alas, most of my business was conducted from afar and this was not practical.
A Ridiculous Number of Possible Spacings between 15 and 32 Wires Per Inch.
Why is This Important? Only a few of these are likely to be used by any one mould maker but all are potentially useful. If you are trying for a certain spacing using only the various diameters of wire that you already own, having the ability to adjust the spacing by minute amounts can be very useful. One of these spacings could turn out to be ‘just the thing’ to work well with the characteristics of the wire at hand.
| wires per inch (pins x clicks) | wires per inch (pins x clicks | wires per inch (pins x clicks | wires per inch (pins times clicks) |
| 15.00: (15 x 13) | 18.20: (7 x 5) | 21.27: (18 x 11) | 25.07: (27 x 14) |
| 15.17: (7 x 6) | 18.35: (24 x 17) | 21.36: (23 x 14) | 26.00: (1/2 turn) |
| 15.60: (6 x 5) | 18.42: (17 x 12) | 21.67: (5 x 3) | 27.00: (27 x 13) |
| 15.74: (23 x 19) | 18.47: (27 x 19) | 21.94: (27 x 16) | 27.08: (25 x 11) |
| 15.89: (11 x 9) | 18.57: (10 x 7) | 22.00: (22 x 13) | 27.44: (19 x 9) |
| 16.00: (16 x 13) | 18.69: (23 x 18) | 22.10: (17 x 10) | 27.63: (17 x 8) |
| 16.06: (21 x 17) | 18.78: (13 x 9) | 22.29: (12 x 7) | 27.86: (15 x 7) |
| 16.42: (24 x 19) | 18.91: (16 x 11) | 22.45: (19 x 11) | 28.17: (13 x 6) |
| 16.47: (19 x 15) | 19.00: (19 x 13) | 22.75: (7 x 4) | 28.36: (24 x 11) |
| 16.61: (23 x 18) | 19.06: (22 x15) | 23.00: (23 x 13) | 28.60: (11 x5) |
| 16.71: (23 x 18) | 19.12: (25 x 17) | 23.11: (16 x 9) | 28.89: (20 x 9) |
| 16.90: (13 x 10) | 19.50: (3 x 2) | 23.21: (25 x 14) | 29.25: (9 x 4) |
| 17.00: (17 x 13) | 19.93: (23 x 15) | 23.40: (9 x 5) | 29.55: (25 x 11) |
| 17.11: (25 x 14) | 20.00: (20 x 13) | 23.64: (20 x 11) | 29.71: (16 x 7) |
| 17.33: (4 x 3) | 20.09: (17 x 11) | 23.83: (11 x 6) | 29.90: (23 x 10) |
| 17.55: (27 x 20) | 20.22: (14 x9) | 24.00: (24 x 13) | 30.33: (7 x 3) |
| 17.59: (23 x 17) | 20.31: (25 x 16) | 24.14: (13 x 7) | 30.88: (19 x 8) |
| 17.64: (19 x 14) | 20.43: (11 x 7) | 24.38: (15 x 8) | 31.57: (17 x 7) |
| 17.73: (15 x 11) | 20.58: (19 x 12) | 24.56: (17 x 9) | 31.78: (22 x 9) |
| 17.88: (11 x8) | 20.65: (27 x 17) | 24.70: (19 x 10) | 31.91: (27 x 11) |
| 18.00: (18 x 13) | 20.80: (8 x 5) | 24.82: (21 x 11) | |
| 18.06: (25 x 18) | 21.00: (21 x 13) | 24.92: (23 x 12) | |
| (next column) | 21.13: (13 x 8) | 25.00: (25 x 13) |
The table above is based on a set of 12 double-sided counting wheels. The smallest number of pins (around the circumference of a wheel) is 3; the largest number is 27. The 26 pin wheel is left out because it turns out to have little value. (A 26 wire per inch spacing can be made simply by turning the crank 1/2 turn for each laid wire added.) Otherwise the set is complete with all numbers from 3 to 27 included.


The artisanal infrastructure would have prerequisites. Including drainage speed (i.e.,vat temperature) fiber to fines character and handling durability (cover repairability). Empirical approach is all we now have.
LikeLike